Since late August, Acquia has been gradually upgrading from Solr 8 to Solr 9, a process that will culminate with the migration of production environments in the second half of September. This upgrade brings significant improvements and changes that require the attention of development teams.
Choosing the self-service path gives you more control over the timing of the upgrade and the ability to verify your custom configuration before the date scheduled by Acquia. This proactive approach ensures a smooth transition and guarantees that your website's search functions stably in production.
This article details the process for performing a self-service Solr 9 upgrade in Acquia environments, focusing on key configuration aspects in Drupal and the management of custom configsets.
What does the change to Solr 9.8 entail?
Solr 9 represents a significant evolution, built on Lucene 9, bringing improvements in index management, query efficiency, and a more modern and secure foundation. Among the most notable innovations is native capability for vector search (KNN and embeddings), opening the door to semantic and AI-driven search functionalities.
Key aspects to consider for configuration primarily revolve around changes in format and module management. Solr 9 has removed support for stateFormat=1, requiring collections to be migrated to stateFormat=2 via the MIGRATESTATEFORMAT API, or by creating new indexes from scratch, as proposed by Acquia in their upgrade processes.
A critical point is the treatment of <lib/> directives in solrconfig.xml starting with Solr 9.8, these directives have become an "opt-in" feature and will be ignored by default. This change is due to security reasons, and libraries must now be configured on the server itself using the SOLR_MODULES parameter, core "lib" directories, etc. This change is something to keep in mind when configuring the local environment.
Finally, it is important to highlight the removal of obsolete components such as the DIH (Data Import Handler) and certain legacy caches, which will involve reviewing configsets to adapt existing configurations to Solr 9.
Configuration
In Drupal, the Search API Solr module is essential for interacting with and configuring Solr collections/cores. When upgrading to a new Solr version, such as Solr 9, the configuration process in Drupal is guided by the following steps:
Prerequisite: Ensure that the Search API Solr module in your Drupal is updated to a version compatible with Solr 9 (>= 4.3) and that the configuration files provided by the module are available in your configuration folder.
- Update the Solr version in the environment.
- Update the configuration in Drupal and generate the new configset.
- Apply the configset to the Solr core/collection.
In this article, we will focus on the configuration and configset generation section.
Update the configuration in Drupal and generate the new configset
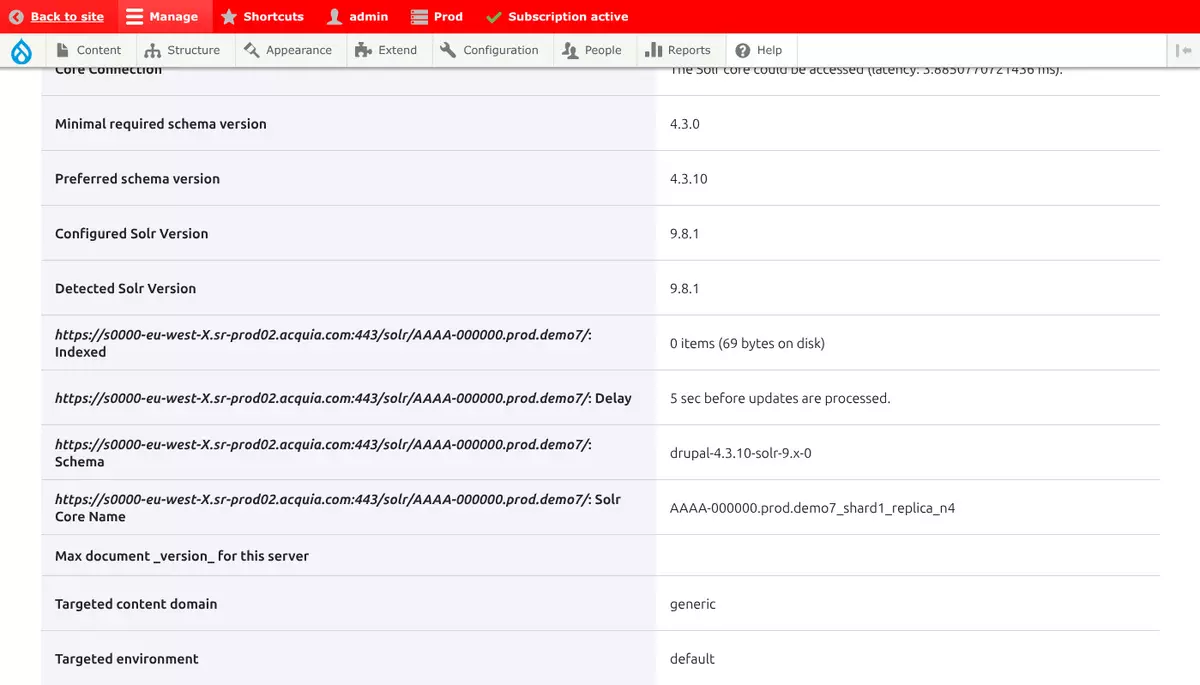
Right after updating the Solr version and it connects correctly to the server, the Search API status screen will look similar to this:
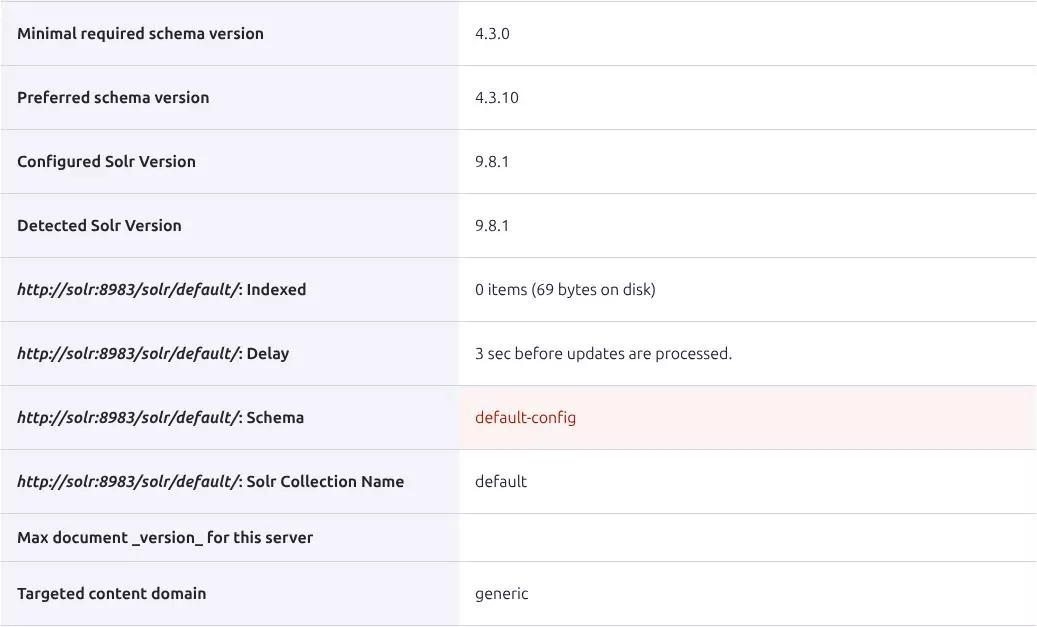
Here we see that "Configured Solr Version" is correct if it's set for autodiscovery. "Detected Solr Version" is the actual server version, and "*:Schema" refers to the configset used, in this case, the one provided by Solr by default. If "Detected Solr Version" is not correct, clear caches to force an update. Update the configured Solr version in Search API if necessary.
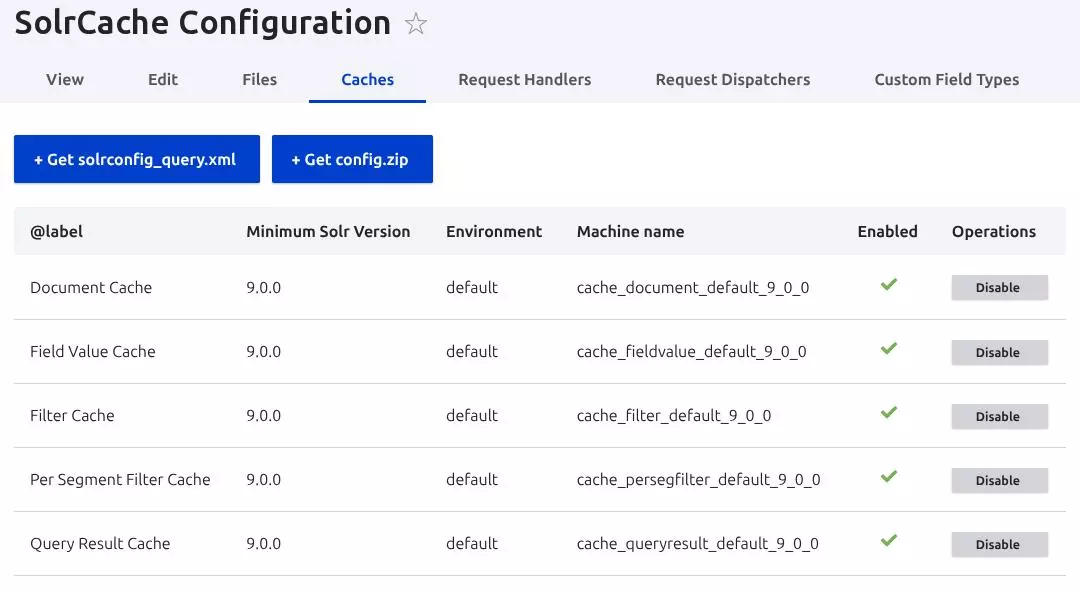
The next thing to check is that on the "Caches" tab, all elements are suitable for version 9.
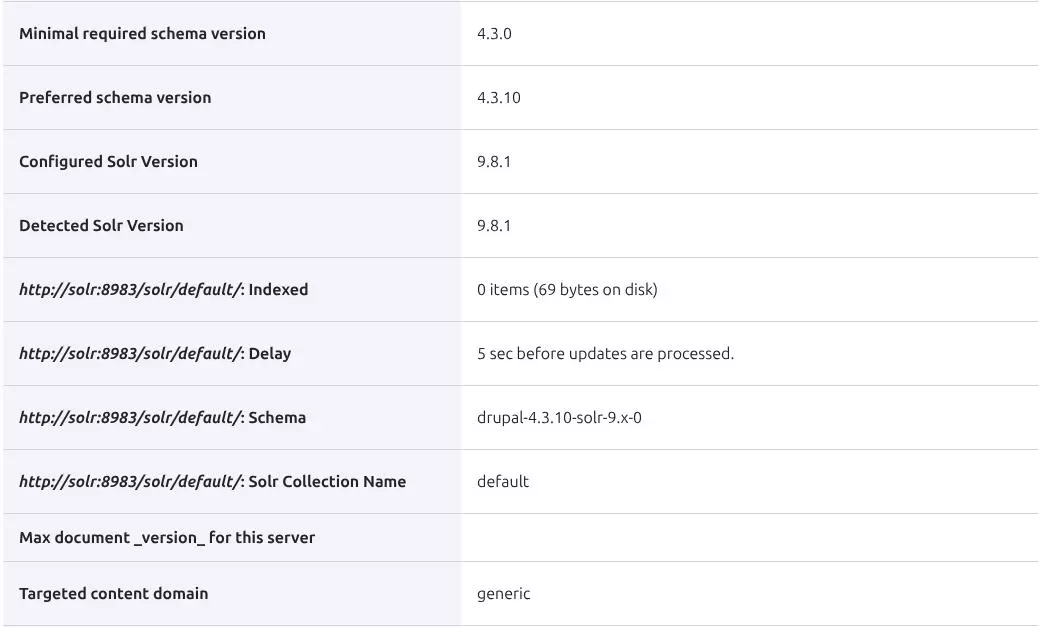
At this point, you can download the configset from "+ Get config.zip" and import it into the Solr core. On the status screen, you will see "*:Schema" updated. Don't forget to export the new Drupal configuration.
If you have adjustments in your field type configurations, it's necessary to review them, as some text processors and caches are no longer available in Lucene 9.

Setup in Acquia
For Solr configuration in Acquia environments, Acquia Search comes into play. This module is responsible for managing and dynamically adjusting the Solr configuration to work optimally on their platform. In essence, Acquia Search detects the available cores for your website and environment (Dev, Stage, Prod) and assigns them dynamically, ensuring that the Search API module in Drupal always points to the correct core without needing to manually configure the Solr server. Acquia Search respects most configurations, except for those related to the connection with the Solr core, where it only allows you to adjust certain timeouts.
It is important to note that a configset generated from a local environment is not valid for an Acquia environment. If you want to use a custom configset, you must download it from one of your Acquia environments. This is because Acquia makes specific micro-adjustments and includes the solrcore.properties file within the configset, which contains specific configurations.
Currently, Acquia has already updated the Solr version in non-production environments, so you can download the configsets from those environments. If you had a custom configset, in the updates made so far, Acquia modified just enough to be able to upgrade the Solr core version, so it may be a good time to bring the configset up to date.
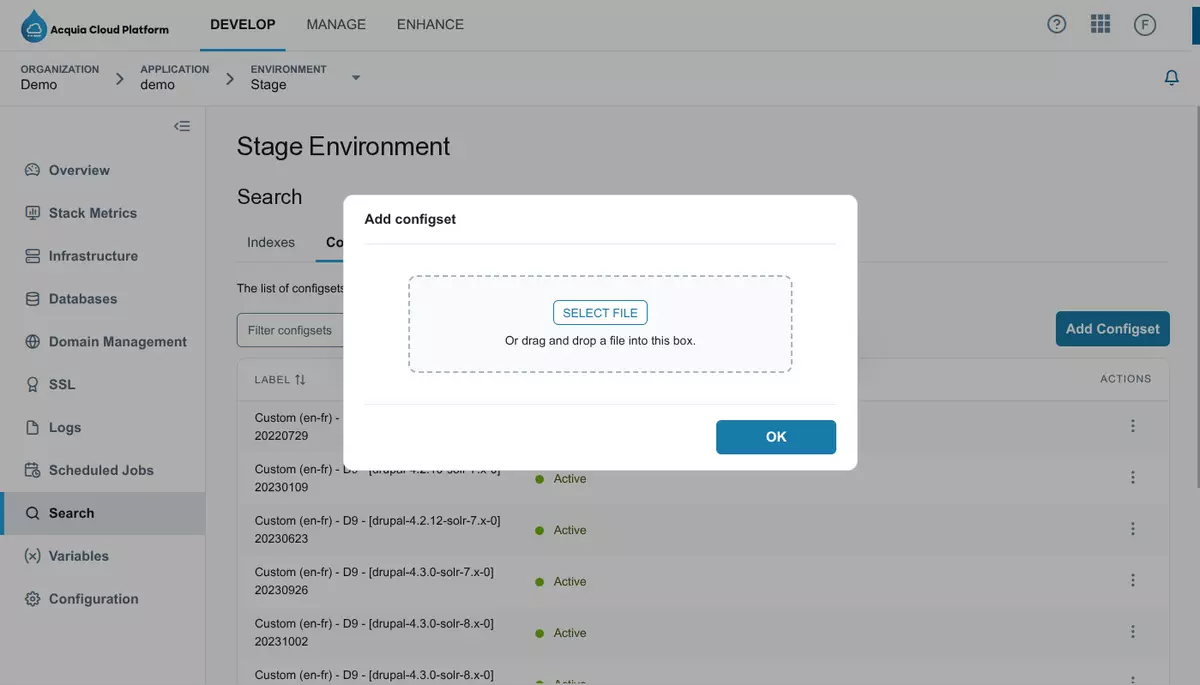
To upload a configset to Acquia, go to the Search section in any environment and then on the Configsets tab, click the "Add configset" button. Once uploaded, the configset will go through a validation process. If it passes, it will appear with the status Active.
The uploaded configsets are available for all environments.
Acquia Self-Service update process with a custom configset
Acquia offers the flexibility to update your Solr indexes to version 9 through a self-service process. It's important to note that this process, especially if performed on production, will cause a temporary interruption in search functionality. Therefore, it is strongly recommended to carry it out during a maintenance window and "off-hours". Since a custom configset will be used, it is advisable to test the steps in another environment before performing them in production.
The guide that Acquia provides is based on the default configsets, but the steps are perfectly applicable to a custom configset.
- Prerequisites
Access to the Acquia Cloud Platform dashboard. - Access to Drush in your production environment or to the Drupal administration with permission to launch a cache clear and index content.
- Knowledge of your Drupal application and environment.
- Have the custom configset compatible with Solr 9.
Important Notes
- Do not skip or change the order of the steps. Each step depends on the previous one.
- Wait for each operation to complete before moving on to the next one.
- Consider performing this process during a scheduled maintenance window to minimize the impact on users
Step 1: Access Acquia search in the Cloud Platform interface
- Log in to the Acquia Cloud Platform user interface.
- Navigate to your application and select the Production environment.
- Click on "Search" in the left-hand menu.
Step 2: Delete the existing index
Warning!
Search functionality will be interrupted at this point until Step 6 is completed.
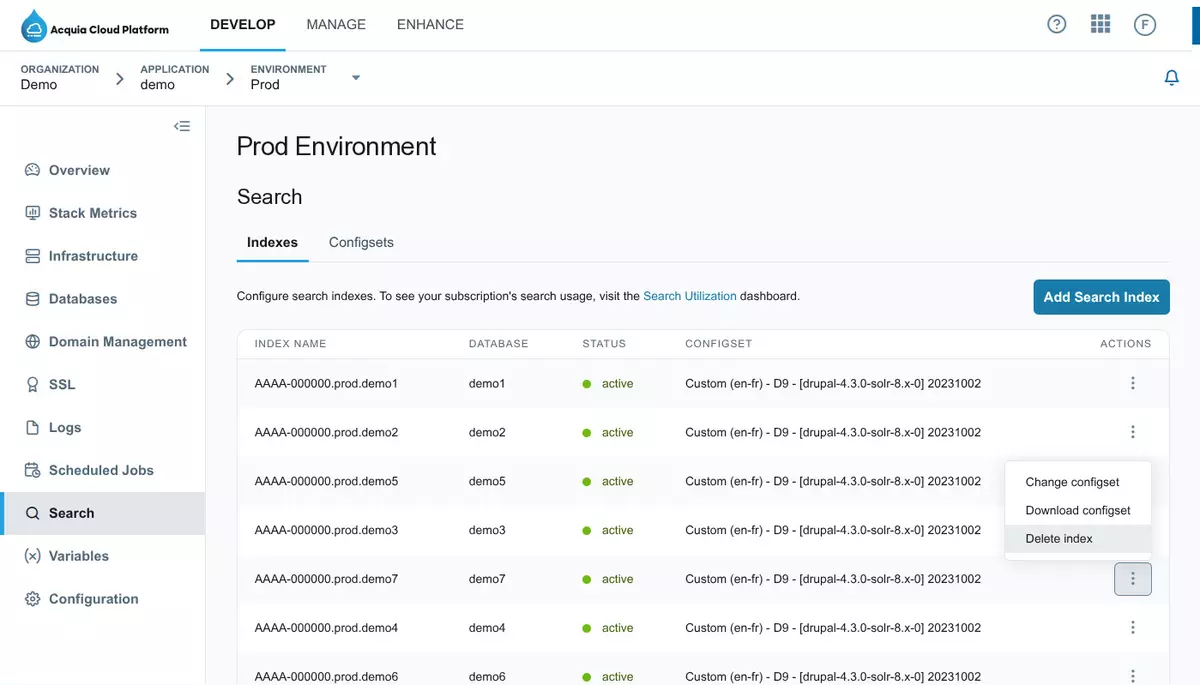
- In the "Search" section, locate your current search index.
- Click the three-dot icon for the index and select "Delete Index".
- Confirm the deletion when prompted and wait for the process to finish.
Step 3: Create new Solr 9 index
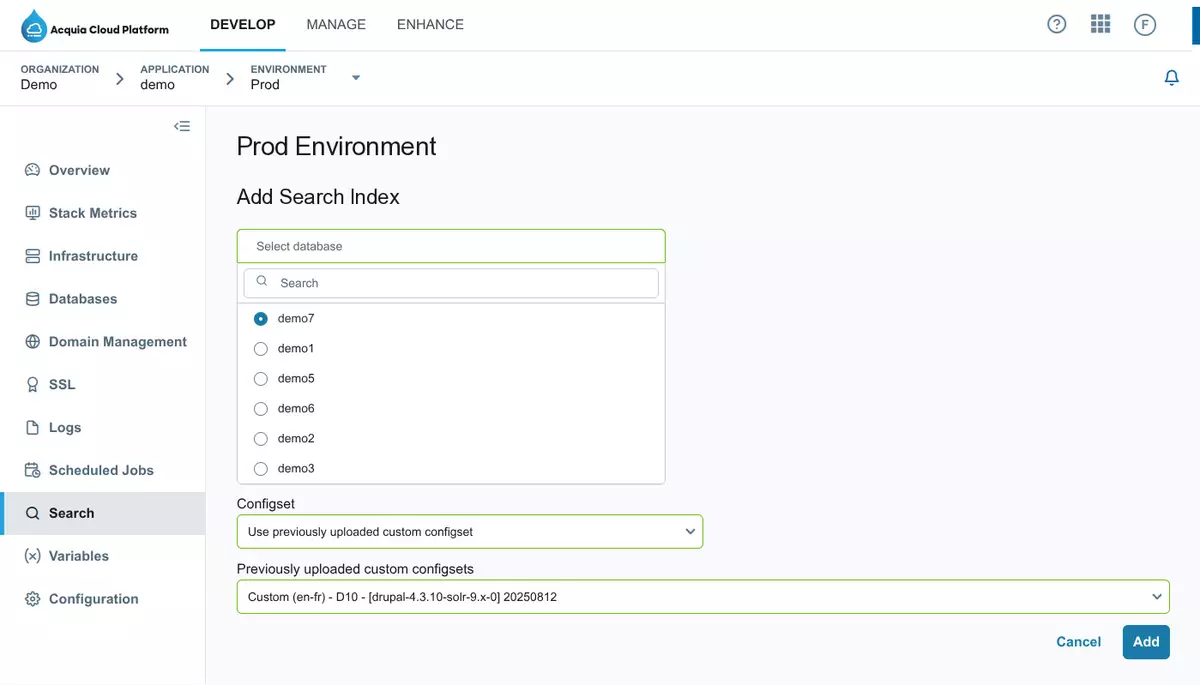
- Click on "Add Search Index".
- Select the database name (usually your application's name).
- For "Config Set", select the configset you previously uploaded.
- Note: If you haven't uploaded your configset yet, you can do so in this step.
- Click on "Add".
- Wait for the index creation to complete. This may take several minutes.
Step 4: Clear Drupal caches

- Log in to your Drupal administration panel.
- Go to Configuration > Search and metadata > Search API.
- You will see that the Solr server is unavailable.
- Clear the cache.
- Once it's done, you'll see that the new core has been correctly detected and appears with the selected configset.
Step 5: Rebuild search tracking information
- Select the Solr server index.
- Click on "Rebuild tracking information" and confirm the operation.
Step 6: Index content
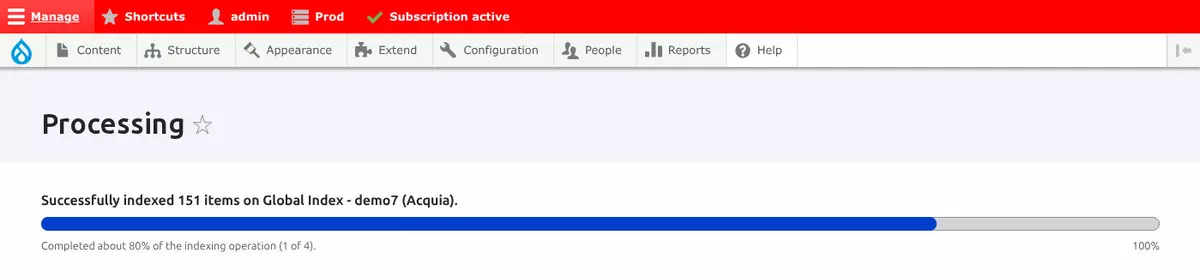
Now you can index the information again by clicking on "Index now".
Once the process is complete, the search functionality should be restored.
Step 7: Verify the index status
Verify that everything was indexed correctly and check that the search is working.
Notes:
Steps 4 through 7 can be completed via the command line. This would be the sequence:
# Step 4: Clear caches
# Connect to your production environment via Drus.
drush cr

# Step 5: Rebuild tracking information
drush sapi-rt

# Step 6: Index content
drush sapi-i --batch-size=100

# Step 7: Verify index status
drush sapi-s
Upgrading to Solr 9 should be a smooth and straightforward process. This article aims to cover the general process and key considerations, but if you still have questions or need help with this update, don't hesitate to contact us.